MySorty: Invoice Capture, Invoice Creation & E-Invoices
With Invoice Capture you can read invoices from PDFs (simple PDFs or
ZUGFeRD) or XML files (XRechnung), enter fields manually or mark them by
clicking on the page, and export the data to various formats, including:
ZUGFeRD, XRechnung, CSV, XML, JSON and PDF..
1. Open an invoice:
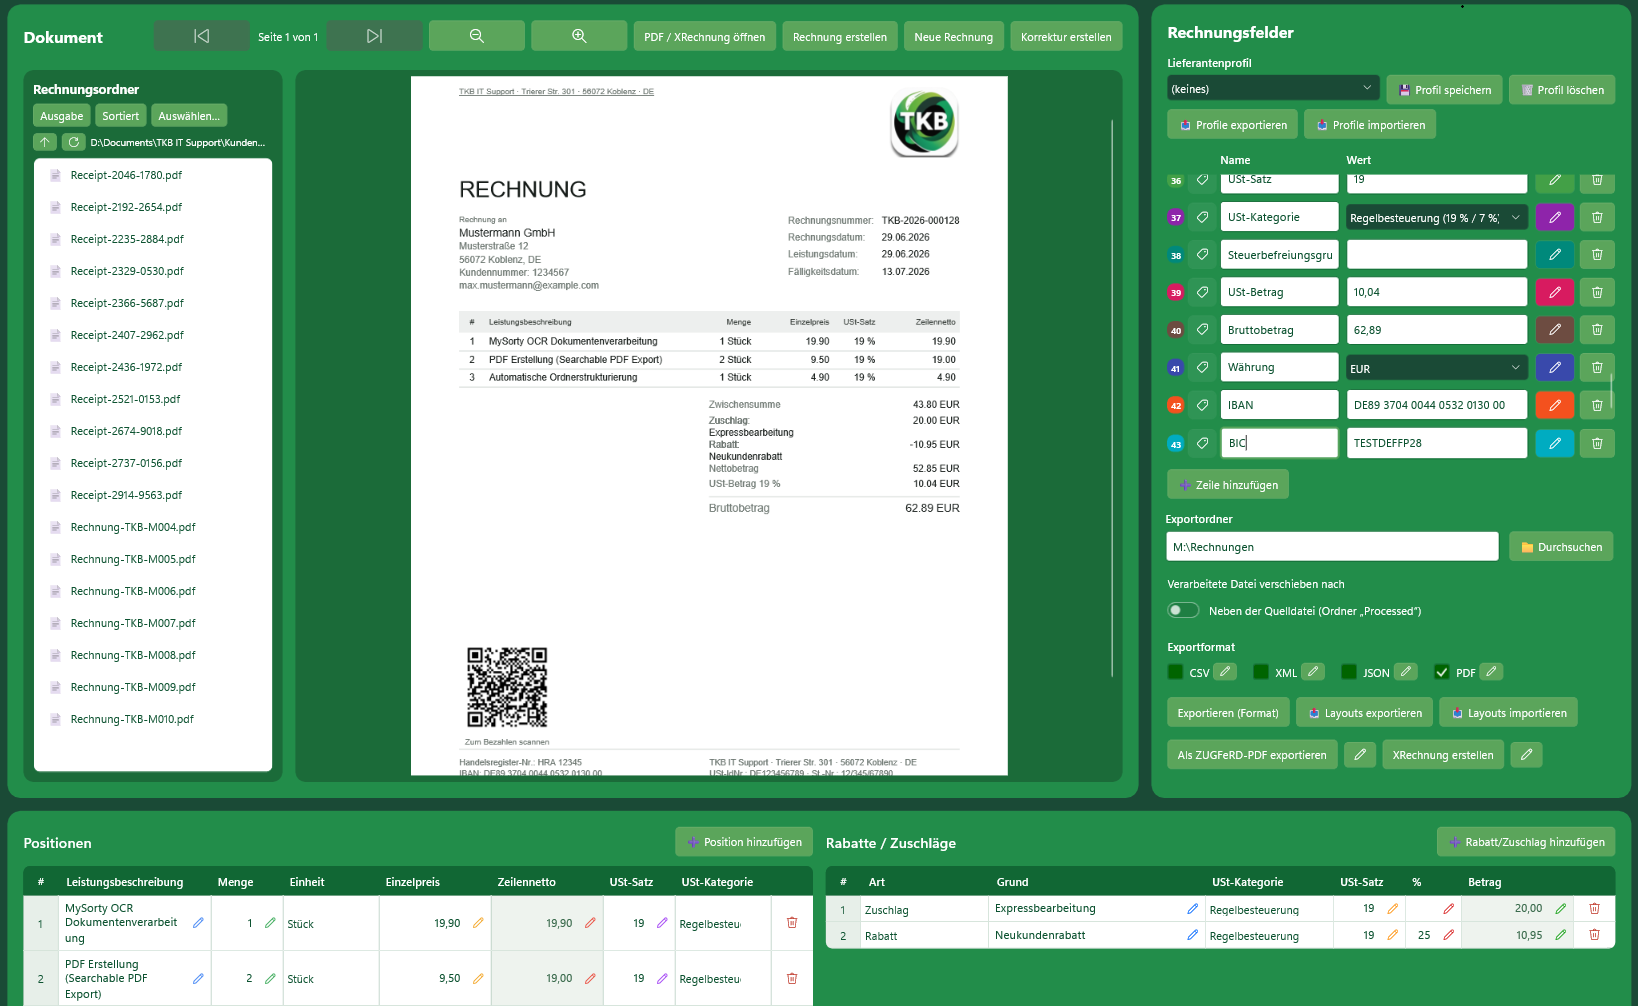
Click "Open PDF / XRechnung" to load an invoice. Supported file types:
- PDF: MySorty opens both normal PDFs and ZUGFeRD/Factur-X PDFs and displays the pages directly. For ZUGFeRD/Factur-X PDFs, the embedded e-invoice data is read automatically.
- XML (XRechnung): MySorty reads the structured invoice data directly from the XML file. No page preview is shown, since XML files contain no visual layout.
Folder browser (left side of the document area):
You can also open invoices directly from the built-in file browser. The three buttons at the top let you switch quickly between:
- Output – your configured output folder
- Sorted – your configured sorting folder
- Select – any folder on your PC
Use the arrow button to navigate to parent folders, and the refresh button to reload the current folder.
Page navigation:
For multi-page PDFs, you can switch between pages using the Previous / Next arrow buttons.
Zoom:
Use the zoom buttons to enlarge or shrink the display so you can read text areas more easily.
2. Automatic reading of e-invoice data:
When a PDF contains an embedded ZUGFeRD, Factur-X or XRechnung file, MySorty reads the data automatically and fills the fields on the right side
Note:
If no embedded data is found, you can fill the fields manually or capture them via zone marking.
3. Capture fields manually (zone marking):
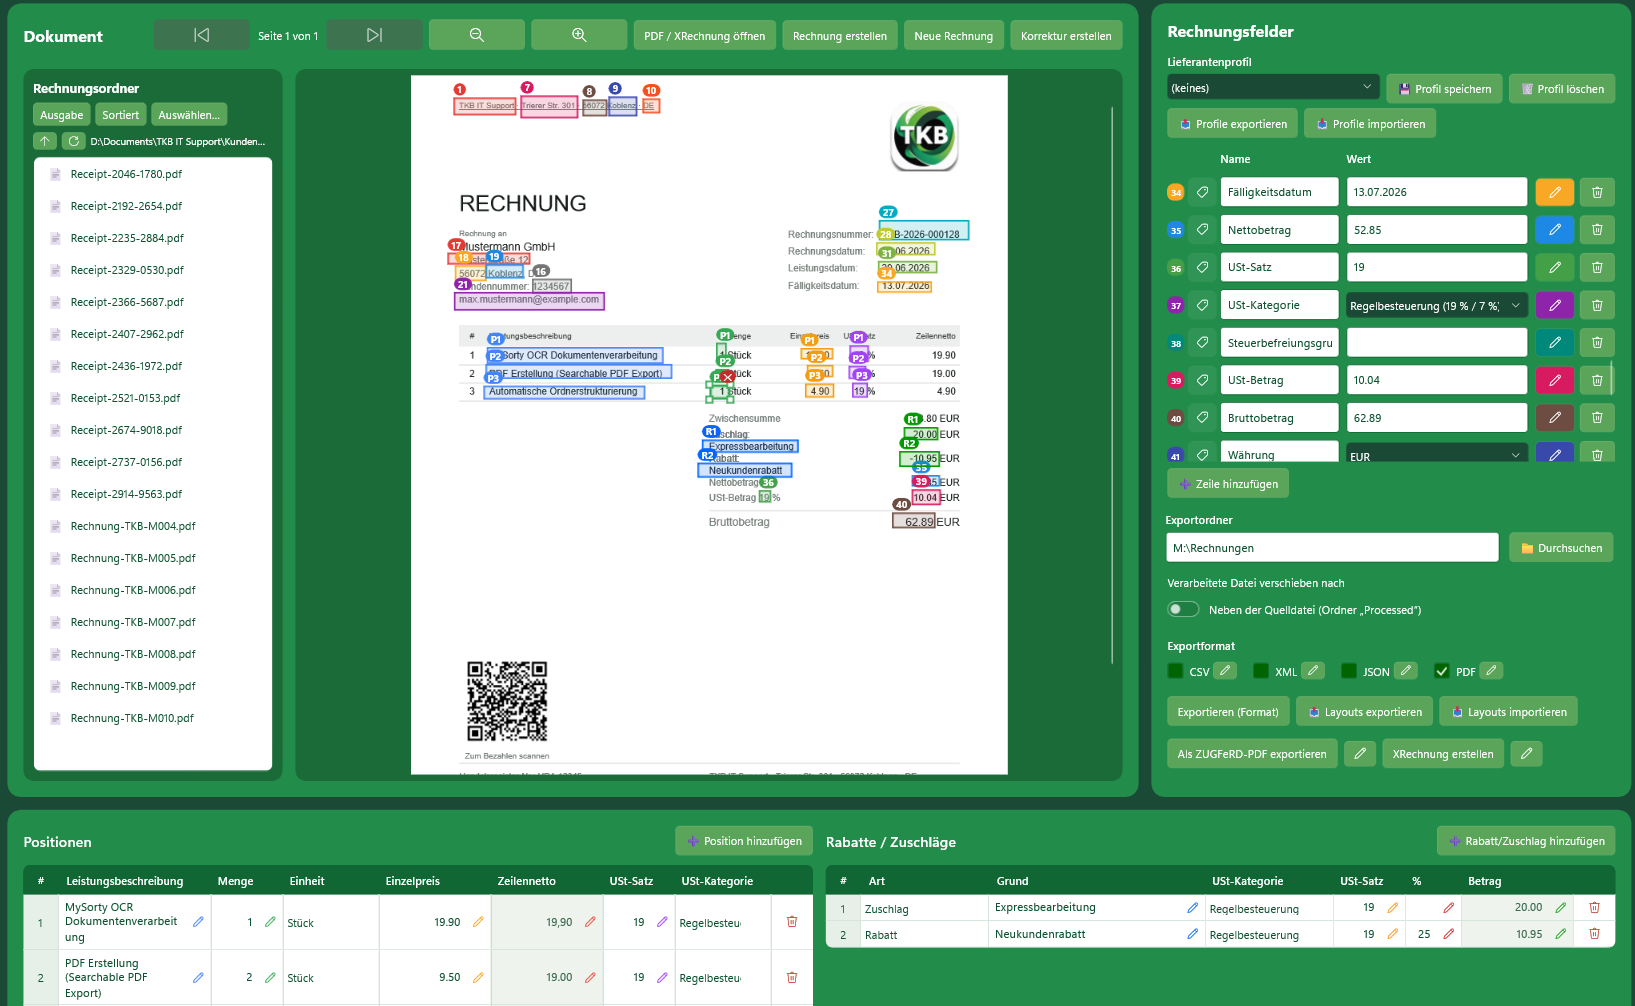
You can take any field value directly from the PDF page by marking a zone on the page.
How it works:
- Click the pen button to the right of a field (e.g. next to "Invoice Number").
- Draw a rectangle around the desired text on the PDF page with your mouse.
- MySorty reads the text in that area automatically and enters it into the field.
Managing zones:
- Each zone is shown in color on the page.
- Click a zone to select it; corner handles appear for resizing or moving.
- Use the red ✕ at the top of the zone to delete the marking (the field value is retained).
- Drag and drop a zone to a new position.
You can save the marked zones as a profile (see Section 9 "Supplier Profiles") to reuse them later for invoices from the same supplier.
Note:
Zone markings work per page. If a field is on page 2, first navigate to page 2 before drawing the zone.
4. Invoice fields:
On the right side you'll find all the fields MySorty uses for export and for e-invoices. The default fields cover all mandatory fields for ZUGFeRD and XRechnung:
- Supplier data: Supplier, VAT ID, Tax number, Commercial register no., Street, Postal code, City, Country, Contact person, Phone, Email
- Buyer data: Buyer, Buyer VAT ID, Customer number, Street, Postal code, City, Country, Buyer email
- References: Invoice number, Order number, Buyer reference (Leitweg-ID / routing ID), Contract number, Cost center
- Date fields: Invoice date, Service date, Service period from/to, Due date
- Amounts: Net amount, VAT rate, VAT category, Tax exemption reason, VAT amount, Gross amount
- Payment: Currency, IBAN, BIC, Payment method, Payment reference, Payment terms
Add row:
With the "Add row" button you can add any custom fields of your own. These appear in the CSV, XML and JSON export.
Mark mandatory fields:
In the dropdown next to "Add row" choose ZUGFeRD, XRechnung or Off (CSV/XML/JSON). Missing mandatory fields are then outlined in red while you fill the invoice in. The choice is saved and does not change the check on export.
Delete row:
Use the trash button to the right of each row to remove fields you don't need.
Marking as supplier identifier:
The key icon next to each field marks that field as a supplier identifier. MySorty uses this value to automatically recognize and apply the matching profile the next time you open an invoice from the same supplier (see Section 9 "Supplier Profiles").
5. VAT categories:
The "VAT category" field determines how VAT is shown on the e-invoice. The following categories are available:
- Standard rate (19% / 7%)
- Reverse charge (§ 13b UStG)
- Tax-exempt (§ 4 UStG)
- Small business scheme (§ 19 UStG)
- Intra-community supply
- Export supply (third country)
- Not taxable
- Zero rate (true 0%)
Note:
If you select a tax-exempt category, MySorty automatically fills the "Tax exemption reason" field with a suitable default text. You can edit this text.
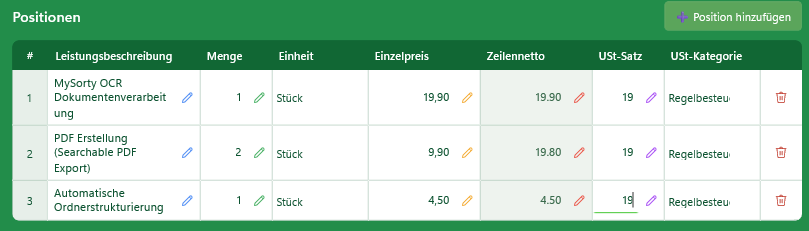
6. Line items:
In the lower area of the window you enter the individual invoice line items.
Each line item contains:
- Description – description of the service or article
- Quantity – the invoiced quantity
- Unit – e.g. piece, hr, day, kg, m², flat rate
- Unit price – price per unit (net)
- Line net – calculated automatically from Quantity × Unit price
- VAT rate – the tax rate applicable to this line item
- VAT category – tax treatment of this line item
With the pen button next to Description, Quantity, Unit price, Line net and VAT rate, you can take the value directly from the PDF via zone marking.
Use "Add line item" to add a new row. Use the red trash button on the right to delete a line item.
Note:
For mixed tax rates (e.g. 19% and 7%), enter the applicable tax rate for each line item. MySorty calculates the tax groups automatically.
Automatic totals:
When you create your own invoice, MySorty calculates the Net amount, VAT amount and Gross amount continuously from your line items, allowances and charges. You no longer need to fill in these three fields yourself.
If you type your own value into one of the three fields, it stays and is not overwritten. Clear the field again and MySorty takes over the calculation. The three fields are handled separately, so you can set the gross amount by hand and let net and VAT keep calculating.
With an incoming invoice open, MySorty calculates nothing automatically, so the amounts read from the PDF stay untouched.
7. Allowances and charges:
In the lower right area you can enter allowances (discounts) or charges at the invoice level.
Each entry contains:
- Type – allowance or charge
- Reason – free-text description (e.g. "Early payment discount", "Shipping costs")
- VAT category and VAT rate – for correct tax classification
- Percent (%) – if you enter a percentage discount, MySorty calculates the amount automatically from the line item totals
- Amount – the absolute allowance or charge amount

8. Early Payment Discount (Skonto):
With the fields "Skonto days" and "Skonto %", you can specify an early payment discount on the invoice.
Enter in "Skonto days" how many days the buyer has to qualify for the discount (e.g. 14), and in "Skonto %" the discount rate (e.g. 2).
MySorty handles the rest automatically:
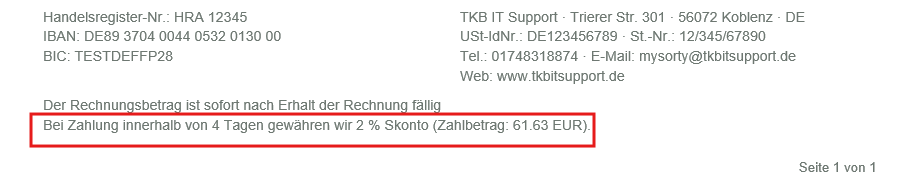
At the end of the generated invoice PDF, a ready-made notice is displayed, for example:
"If payment is made within 14 days, we grant a 2% discount (amount payable: 980.00 EUR)." The payable amount is calculated automatically.
9. Supplier profiles:
With supplier profiles you save all fields, zone markings and settings for a specific supplier and can reuse them for the next invoice from the same supplier with a single click.
Save a profile:
- Fill in all fields and mark the zones on the page.
- Mark a field as a supplier identifier (key icon); the value of this field (e.g. the company name or the VAT ID) is used to automatically recognize the profile in the future.
- Click "Save profile" and give it a name.
Apply a profile automatically:
When you open a new invoice, MySorty searches the PDF text for the saved identifier value. If it is found, the profile is applied automatically and all fields and zones are loaded.
Select a profile manually:
In the "Supplier profile" dropdown you can manually select a saved profile at any time or reset to "(none)".
Delete a profile:
Select the profile in the dropdown and click "Delete profile".
Export / import profiles:
With "Export profiles" you save all profiles as a JSON file for backup or sharing.
With "Import profiles" you load profiles from such a file – existing profiles with the same name are updated, new ones are added.
Note:
Supplier profiles apply to invoices you receive. For your own companies
as the invoice sender, use company profiles (see Section 15).
10. Export folder and target file for processed invoices:
Export folder:
Use "Browse" to choose the folder where MySorty saves all exported files (CSV, XML, JSON, PDF, ZUGFeRD, XRechnung).
Move processed file to:
After a successful export, MySorty moves the source PDF automatically so it isn't accidentally processed twice.
- Next to the source file (Processed folder) – the PDF is moved to a Processed subfolder next to the original file.
- Custom folder – enable the switch and choose any target folder.
Note:
The export folder is stored per company profile (see Section 15). When you
switch the company profile, the export folder switches with it automatically.
11. Export formats:
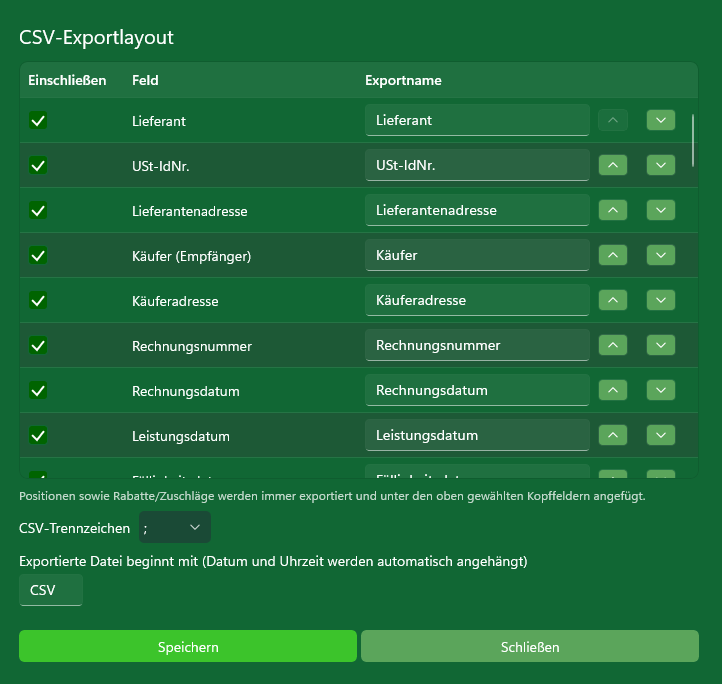
Choose the desired export format via the checkboxes. Use the pen button next to each checkbox to open the layout editor for that format.
CSV:
Exports all fields as a table. In the layout editor you can:
- Show or hide fields
- Rename fields (export name)
- Change the column order with the arrow keys
- Choose the separator (semicolon or comma)
- Set the filename prefix
XML:
Exports all fields as a structured XML file. Layout and field names can be adjusted in the editor.
JSON:
Exports all fields as a JSON file for developers and system integrations.
PDF (simple PDF):
Exports the invoice currently shown in the viewer as a simple PDF. If you previously used "Invoice Preview" (see Section 14), the generated document is exported.
Export / import layouts:
With "Export layouts" you back up all export layouts and settings as a JSON file.
With "Import layouts" you restore them.
Note:
All exported files are saved in the chosen export folder. Existing files with the same name are not overwritten; MySorty numbers them automatically.
12. Create a ZUGFeRD PDF:
ZUGFeRD (also called Factur-X) is a hybrid invoice format: a normal PDF file with a machine-readable XML file embedded in it.
Requirements:
- All mandatory fields must be filled in (Supplier, Invoice number, Date, VAT ID, Buyer, Net, VAT, Gross, at least one line item).
- An export folder must be selected.
How to create a ZUGFeRD invoice:
Option A – From an existing incoming invoice:
- Open the PDF of your incoming invoice via "Open PDF / XRechnung" or the folder browser.
- MySorty reads existing e-invoice data automatically, or you fill the fields manually / via zone marking.
- Check and complete the line items in the lower area.
- Click "Export as ZUGFeRD PDF".
Option B – Create your own invoice from scratch (see Section 14):
- Click "New invoice" to start with empty fields.
- Fill in all fields and enter your line items.
- Click "Export as ZUGFeRD PDF". MySorty generates the invoice PDF automatically and embeds the XML data straight into it.
If you want to see the layout beforehand, click "Invoice Preview" (see Section 14). This is optional and not required for the export.
For both options, MySorty automatically checks all fields, shows errors or warnings, and creates the finished ZUGFeRD file in the export folder.
Filename:
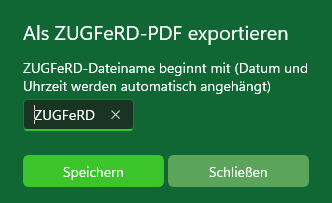
Click the pen button next to the ZUGFeRD button to set the filename prefix. Date and time are appended automatically.
Conformance level:
MySorty creates ZUGFeRD files according to the EN 16931 (COMFORT) standard.
Note:
A ZUGFeRD file always consists of a PDF plus XML. For your own invoices MySorty creates the PDF itself. If you only have a plain XML file with no accompanying PDF, use XRechnung instead (Section 13).
13. Create an XRechnung :
XRechnung is the official German format for invoices to public-sector clients (B2G). It is a pure XML file without visual content that is read directly into the recipient's system.
Additional mandatory fields for XRechnung:
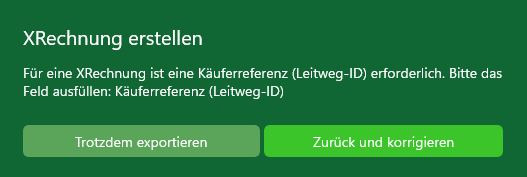
- Buyer reference (Leitweg-ID / routing ID) – provided by the public-sector client and identifies the recipient in the system.
- Contact person, phone and email of the seller – for the recipient's queries.
- Email address of the buyer – electronic recipient address.
- Complete postal address of both parties (Street, Postal code, City, Country).
- IBAN – payment data is mandatory for XRechnung.
How to create an XRechnung:
- Fill in all fields including the mandatory fields listed above.
- Click "Create XRechnung".
- MySorty checks all fields, points out missing entries, and creates the XML file in the export folder.
Filename:
Click the pen button next to the XRechnung button to set the filename prefix.
Note:
An XRechnung needs no PDF at all. Fill in the fields and click "Create XRechnung" directly.
14. Create invoice (your own invoice PDF):
With "Invoice Preview" MySorty generates a print-ready invoice PDF from the entered fields and line items and shows it in the viewer, so you can check the finished layout before exporting.
Company logo:
The company logo lives in the company profile. You open it with the pen button next to the
"Company profiles" dropdown at the top of the invoice area (see Section 15). It appears at the top right of the generated invoice. Supported formats: PNG and JPG. Every company profile has its own logo.
Supplier default values:
In the same dialog you enter your own company data (Name, VAT ID, Tax number, Address, Contact, IBAN, BIC). These are automatically entered into every new invoice, so you only need to fill in the buyer-side fields. If you work with several companies, create a company profile for each one (see Section 15).
Procedure:
- Pick the company issuing the invoice from the "Company profiles" dropdown at the top. The sender fields are filled in automatically.
- Fill in the remaining fields and enter your line items. Net, VAT and Gross are calculated by MySorty (see Section 6).
- Click "Invoice Preview" if you want to look at the result.
- Export the invoice as a simple PDF, as a ZUGFeRD PDF or as an XRechnung.
New invoice:
With the "New invoice" button you clear all fields and start with an empty template. The sender data of the currently selected company profile is entered again automatically.
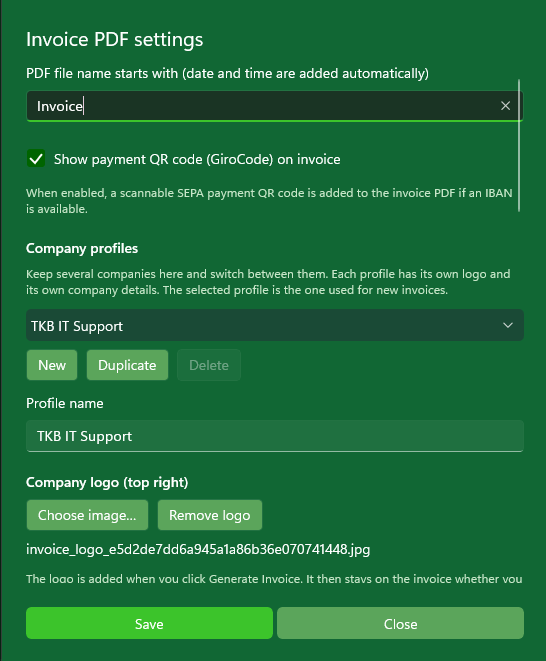
15. Company Profiles:
If you work with more than one company, you can create a separate company
profile for each one and switch between them. Every profile stores its own logo,
its own company details and its own export folder.
Not to be confused with supplier profiles:
Company profiles are your own companies, meaning the sender of the invoice.
Supplier profiles (Section 9) are saved fields and zone markings for invoices
you receive from others.
Where to find the profiles:
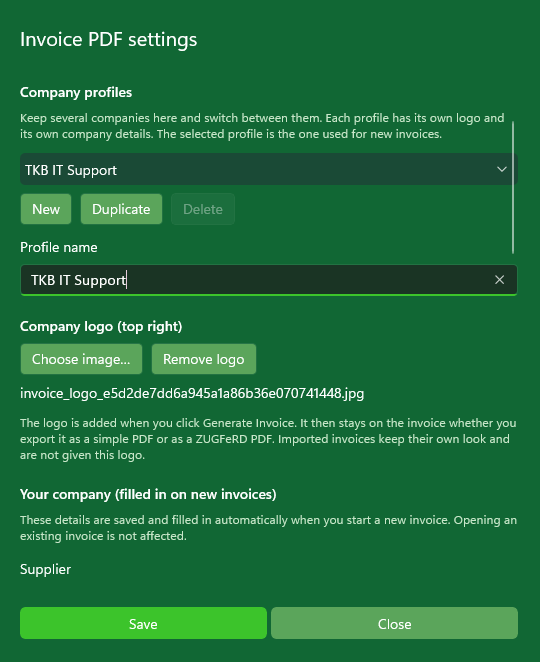
At the top of the invoice area there is a "Company profiles" dropdown. Right next to it sits a pen button that opens the editing dialog.
Create a profile:
1. Click "New".
2. Enter a name in the "Profile name" field, for example the company name.
3. Upload the company logo via "Choose logo".
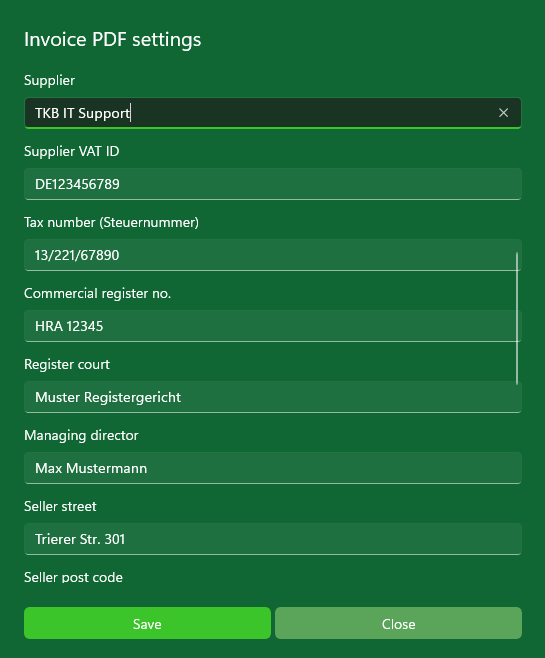
4. Enter the company data: Company name, VAT ID, Tax number, Commercial register no., Register court, Managing director, Address, Contact person, Phone, Email, Website, IBAN, BIC and Bank name.
5. Click "Save".
Switch profiles:
Pick the company you want directly in the "Company profiles" dropdown at the top of the invoice area. MySorty immediately applies that profile's data, logo and export folder.
Duplicate a profile:
Use "Duplicate" to create a copy of the current profile, including its logo,
company data and export folder. Useful when two companies differ in only a few
details.
Delete a profile:
Select the profile and click "Delete". The last remaining profile cannot be
deleted.
Its own export folder per profile:
The export folder (Section 10) is stored per profile. When you switch profiles,
the export folder switches with it, so each company's invoices land in the right
folder automatically. If no folder is set for a profile, MySorty uses the last
selected folder.
Note:
- Changes are only applied when you click "Save". If you leave the dialog with "Close", all profiles stay unchanged, including a profile you deleted by accident.
- The filename for invoice PDFs and the GiroCode setting apply to all profiles together. They live in a separate dialog behind the pen button next to the "PDF" checkbox in the "Export format" row.
- When you switch profiles, the sender fields of the invoice you are creating update immediately. An incoming invoice you have open stays unchanged, so the data read from it is preserved.
Note:
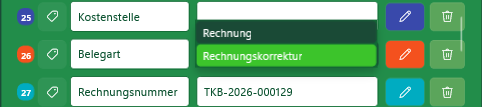
- The field "No. of corrected invoice" must be filled in — MySorty will warn you if it is left empty.
- You can also manually create a correction without an original invoice by setting the "Document type" field to "Invoice Correction" and filling in all fields manually.
16. Create Invoice Correction:
If you need to correct or cancel an already issued invoice, you can create a standards-compliant invoice correction with a single click.
How it works:
- Load the original e-invoice via "Open PDF / XRechnung" or the folder browser. MySorty automatically fills in all fields.
- Click the "Create correction" button.
- MySorty automatically prepares the correction: the original invoice number and original date are added as references, the invoice date is set to today, and all amounts and line item quantities are inverted (negated).
- Enter a new invoice number for the correction.
- Quickly review the fields and line items.
- Export the correction as a simple PDF, as a ZUGFeRD PDF or as an XRechnung.
Correction notification bar:
As soon as you click "Create correction", a notification bar appears at the top reminding you to enter a new invoice number and complete the correction. It also displays the original invoice number and date.

On the generated PDF:
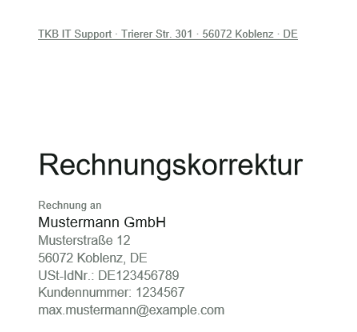
The generated PDF is titled "Invoice Correction" instead of "Invoice" and contains all negative amounts as well as a reference to the original invoice.
Note:
- If you only want to adjust individual line items, you can still manually edit the fields after clicking "Create correction".
- The field "No. of corrected invoice" must be filled in — MySorty will warn you if it is left empty.
- You can also manually create a correction without an original invoice by setting the "Document type" field to "Invoice Correction" and filling in all fields manually.
17. Payment QR Code (GiroCode):
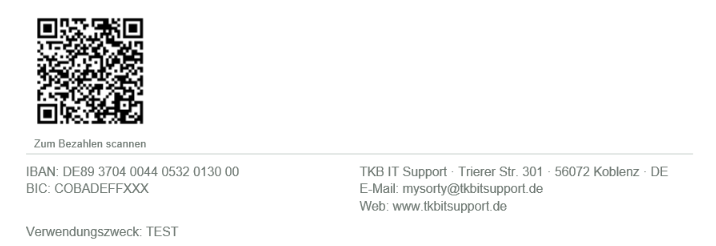
When MySorty generates an invoice PDF, whether via "Invoice Preview" or during the ZUGFeRD export, it automatically adds a GiroCode on the last page of the invoice, provided an IBAN is entered and the gross amount is greater than 0.
What is a GiroCode?
The GiroCode is a standardized SEPA QR code (EPC069-12) that all German online banking apps and many banking apps in the EU can scan directly. The recipient only needs to scan the QR code with their banking app – all payment details are filled in automatically, without having to manually type in IBAN, amount or payment reference.
The QR code automatically contains:
- Recipient name – from the "Supplier" field
- IBAN – from the "IBAN" field
- BIC – from the "BIC" field (optional, may be left empty)
- Amount – the calculated gross amount of the invoice
- Payment reference – from the "Payment reference" field, or if empty, the invoice number
Position on the invoice:
The QR code appears at the bottom left of the last page, above the footer, with the caption "Scan to pay".
Enable or disable the GiroCode:
In the PDF settings dialog (pen button next to "PDF export format") there is the option "Show payment QR code (GiroCode) on invoice". Remove the checkmark if you don't want the QR code on the invoice – e.g. for internal documents or invoices transmitted via PEPPOL/XRechnung.
When is no QR code generated?
- When no IBAN is entered
- When the gross amount is 0 or negative
- When the option in the PDF settings dialog is disabled
Note:
The GiroCode only works with SEPA transfers (euro area). It is not suitable for other payment methods (e.g. direct debit, credit card). Most German banking apps (Sparkasse, Volksbank, Deutsche Bank, DKB, ING, etc.) support scanning the GiroCode directly.
18. Consistency check:
Before MySorty generates an e-invoice (ZUGFeRD or XRechnung) or an export, it automatically checks all
entered values for correctness.
Missing or incorrect fields are highlighted in red and listed in an overview.
What is checked:
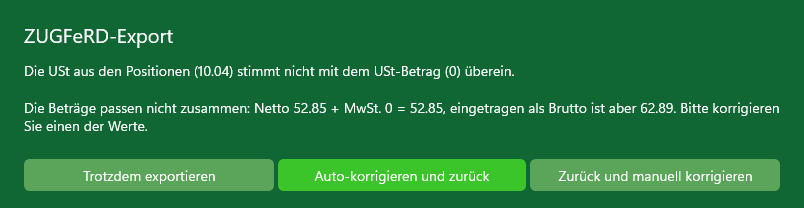
- Net + VAT must match the gross amount.
- The VAT rate is recalculated against the net and VAT amount.
- The sum of line item totals must match the net amount (minus discounts and plus surcharges).
- Date fields are validated for a correct format, e.g. 31.12.2026 and 2026-12-31 are supported.
- All required fields must be filled in.
- For tax-exempt categories, a valid tax exemption reason must be provided.
If errors are found, MySorty displays an overview of all issues. You can choose:
- "Back and correct" – closes the dialog, the incorrect fields remain highlighted in red so you can directly see and fix them.
- "Automatically correct amounts" – this button appears when MySorty detects that the entered line item totals do not match the header totals (net, VAT, gross). MySorty recalculates the correct values from your line items and automatically fills in the Net, VAT amount, and Gross fields. After that, you can immediately restart the export.
- "Export anyway" – exports the file despite warnings (not recommended for official e-invoices).